


 0 Commentа
 Printing
 08.11.25
 23.08.21
A HANDMADE BRACELET IS THE PERFECT GIFT FOR A FRIEND
It is difficult to determine when the concept of exchanging bracelets as a way of representing friendship began, but it is believed to have originated in Central America. The patterns and weaving designs can be applied in various types of crafts and colors.
Friendship bracelets continue to be popular among children, teenagers, celebrities, and even adults, and are unisex. Friendship bracelets are exchanged between friends or given as a gift as a symbol of friendship and to show how much friends value and appreciate each other.
These bracelets are usually handmade. In the online space of EM ART, we have many step-by-step guides showing how to make different friendship bracelet patterns, and it shouldn’t be too difficult for you.
In any case, tradition says that friendship bracelets should be worn until the thread or cord wears out and the bracelet falls off. This honors the time and effort your friend put into making it.
It is also believed that if you make a wish while putting on the bracelet, the wish will come true when the bracelet eventually falls off.
Shamballa Bracelet – The Perfect Gift for Your Friends!
Have you seen Shamballa-style bracelets and thought about making one yourself? With basic macramé techniques, some cord, and beautiful beads, you can!
They add sparkle to any outfit and are a hit among jewelry lovers of all ages. Today’s tutorial will guide you on how to create your own adjustable Shamballa-style bracelet.
Basic Materials for Bracelets
- Beading cord is the string, thread, wire, or cord on which beads are strung for bracelets, necklaces, and many other jewelry pieces.
Different types of stringing materials can include soft, flexible beading wire, nylon cord, elastic leather, and various threads such as silk, monofilament, or polyester. These are all flexible materials that allow your jewelry to shine and move with you.
- The clasp is a type of jewelry finding used in designs to open and close a particular piece of jewelry according to the sliding style, and the clasp is used to achieve this concept.
You will find a huge variety of clasps in EM ART stores, offering diversity in style, design, colors, and mechanisms.
- Beads are the eye-catching element of your jewelry designs.
Take a close look at our wide selection of bead shapes and sizes, the bead hole dimensions you need to consider, and even some fun and useful bead tips.
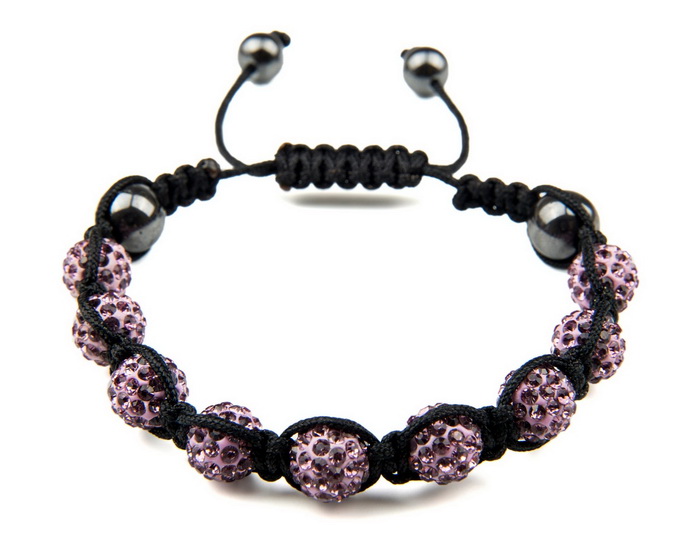
Supplies You’ll Need to Make Your Own Shamballa Bracelet
You will need:
- Cord
- Sparkling crystal beads (you can use 12 mm crystals)
- Scissors
- Craft glue
- Large blunt-end needle (plastic canvas needles work great for this!)
Let’s get started!
First, cut three lengths of cord – two measuring about 20 inches and one measuring about 6 feet. You’ll need an additional 2 feet of cord to complete the sliding closure at the end, so make sure you have around 12 feet of cord in total before you begin.
Secure your two 20-inch cords to your workspace. To make this easier, you can use a clipboard or simply pin or tape it to any surface that will allow you to work comfortably.
Find the center of your long cord and tie it around your two shorter cords about 6 inches down from the top. I’ll refer to the shorter cords as your central cords when explaining the knots, and each side of the long cord as the right and left strands.
There’s really no rule that says you MUST have two central cords, but it does make for a wider bracelet than using just one. You can try more if you like – just make sure that the hole in your beads fits all of your central cords.
You can move the entire bracelet up to your clipboard to give yourself more space to work. Then apply a little craft glue to the ends of your two central cords to prevent fraying. This helps a lot when it’s time to add beads, though it’s not required – especially if you’re using beads with large holes.
The knots can seem confusing at first, but it’s really just a simple square knot enclosing those central cords. You can start from either the right or left side (you’ll alternate sides as you go).
First, pass the right strand over the central cords, making a loose loop. Then take your left strand and pass it over the right strand, then under the central cords.
Finally, thread it back through the loop you made on the right side and pull it through. Tighten both the right and left strands to close the knot, keeping the central cords taut. If done correctly, you’ve just created a basic square knot enclosing the central cords inside.
You need to alternate sides to keep your weaving straight. If you always start your knot on the same side, the knots will spiral — which is also quite lovely, but not the look we’re going for in this stylish bracelet!
For this five-bead design, create about 1½ inches of knots. Then thread a bead onto both central cords. (You’ll see how that glue helps in this step!) Next, continue making several more knots – you can add more or fewer beads and knots for different styles.
Friendship bracelets are fun and easy to make! You can give them to a friend or keep them to spice up your own jewelry collection with jewelry-making accessories.
If your friendship bracelet-making skills are particularly refined, you can even sell a few! Start by learning the basic technique, then experiment by adding simple braids, charms, and beads.
In our stores, you’ll find an abundance of materials you need to create without limits. You can easily select your products using a filter search, browse new arrivals, top products, and discounted items.
You’ll receive reliable information on product availability and answers to all your purchase-related questions. If you’re looking for inspiration for your projects, visit the EM ART blog. We’ll help you turn your personal and family celebrations into unforgettable moments!
| Daya (Daya) | Daya |
 I am a huge enthusiast of creating new handmade beauties, whether it is with beads, paper and pen, canvas and acrylic, or yarn. Every form of art or intricate crafting brings additional inspiration! If you are curious about what else we can make and craft with art and craft materials, stay tuned for updates in the blog and, of course, feel free to share your ideas!
| All articles on Daya |
Rate the article 5.00/5 from 1 grades. |
|
| You have already voted for the article | |
Recommended articles
 ONYX THE STONE WITH MAGICAL PROPERTIES
 HOW TO MAKE A STYROFOAM CHRISTMAS TREE?
 MALACHITE THE STONE OF MONEY
 WHY PEOPLE WEAR MOONSTONE?
 0 Comments

| 0 |

| 0 |

| 0 |

|

| 0 |

|
 Subscribe ♥
SEARCH

|

|
Categories
 New
New


Recent Posts
IN THE WORLD OF QUILLING ART
THE MAGIC OF CREATIVE KITS
A HANDMADE BRACELET IS THE PERFECT GIFT FOR A FRIEND
WHAT SHOULD WE KNOW ABOUT JASPER PENDANTS?
3 TOP IDEAS FOR TEMPORARY WALL DECOR AT AN AFFORDABLE PRICE
WOODEN ELEMENTS A TIMELESS TREND FOR YOUR HOME
AMAZING WEDDING DAY CARDS
Recent comments
Dawn Sullivan за IN THE WORLD OF QUILLING ART
Laura за THE ULTIMATE GUIDE TO CLEANSING AND CHARGING GARNET
JER за Discover and Master the Art of 3D Pen Drawings - A Step-by-Step Guide for 2D and 3D Objects and Sculptures
november birthstone за Discover the Power of Your Birthstones by Month, Zodiac Sign and Day of the Week
