


 0 Commentа
 Printing
 18.06.24
 06.11.18
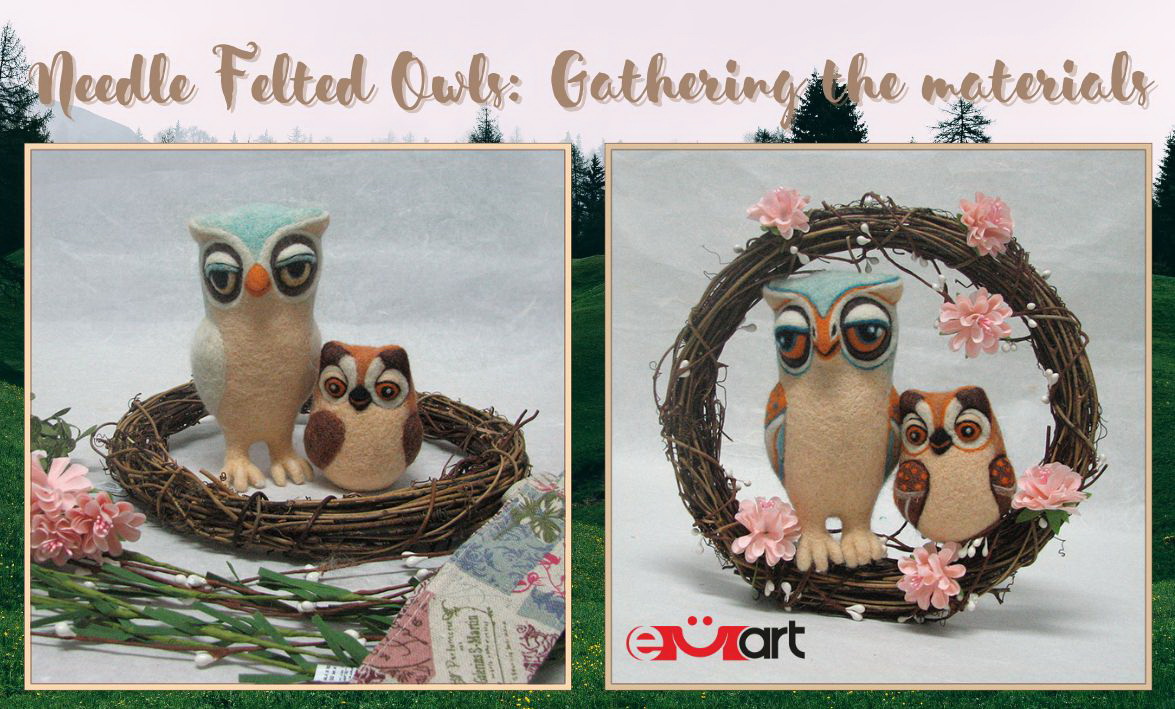
How to DIY 3D Needle Felted Owls
A Step-By-Step Tutorial: Creating 3D Owls with Needle Felting on Styrofoam Base
If you’re curious to try needle felting and have a soft spot for adorable owls, you’ve come to the right place! In this step-by-step tutorial, we will guide you through the process of crafting beautiful three-dimensional (3D) needle felted owls using a styrofoam base.
With the usage of a styrofoam base, you can easily create intricate details and give your owls a lifelike appearance. This technique allows for the shaping of wool fibers into three-dimensional figures, making your creations truly stand out.
But that’s not all! We will also show you how to use these needle felted owls for a wonderful home decoration.
So, gather your tools and materials, and let’s dive into the how-to and unleash your creativity!
1. Preparing the Needed Supplies
Here are all needed tools and supplies for Needle Felting your 3D Owls:
- Felting wool in various colors
- Felting Needles
- A Pad to work on
Tip: If you’re already passionate about Needle Felting, you can simply get a Needle Felting Kit – it includes everything you’d ever need for a variety of future projects: a pad to work on, wool in 16 different colors, +10 needles, and a wooden handle for them!
For more advanced hobbyists, this project can easily be done without a Styrofoam base, and yes, the needle felted owls would become softer. However, we chose to use it for two main reasons:
First, crafting felted owls for home decoration requires slightly bigger owls, and the Styrofoam helps us avoid wasting too much wool unnecessarily. And second, for beginners, using a base provides helpful guidance and safety when starting needle felting.
So, you can decide whether to use it or not, according to your personal preferences.
- Craft Cutters or modeling knife – optional
If you can’t find Styrofoam shapes satisfying for your projects base, you can always fix the needed sculpture.
- Pipe Cleaners - optional
If the figure you’ve planning to needle felt has more defined limbs like legs and arms, you can create a skeleton using pipe cleaners. This will make the figure more stable, ensuring more secure connections between the individual elements.
Additional Supplies for the final touches:
- Wooden Wreath for the Wall Décor option
- Decorative Fabric Branch and Artificial Flowers to beautify it
How to create your first 3D Needle Felted Owls and transform them into Wall Decor
Making owls through the art of needle felting requires focused attention and a keen eye for detail. However, the process itself is highly engaging and the end results are incredibly rewarding!
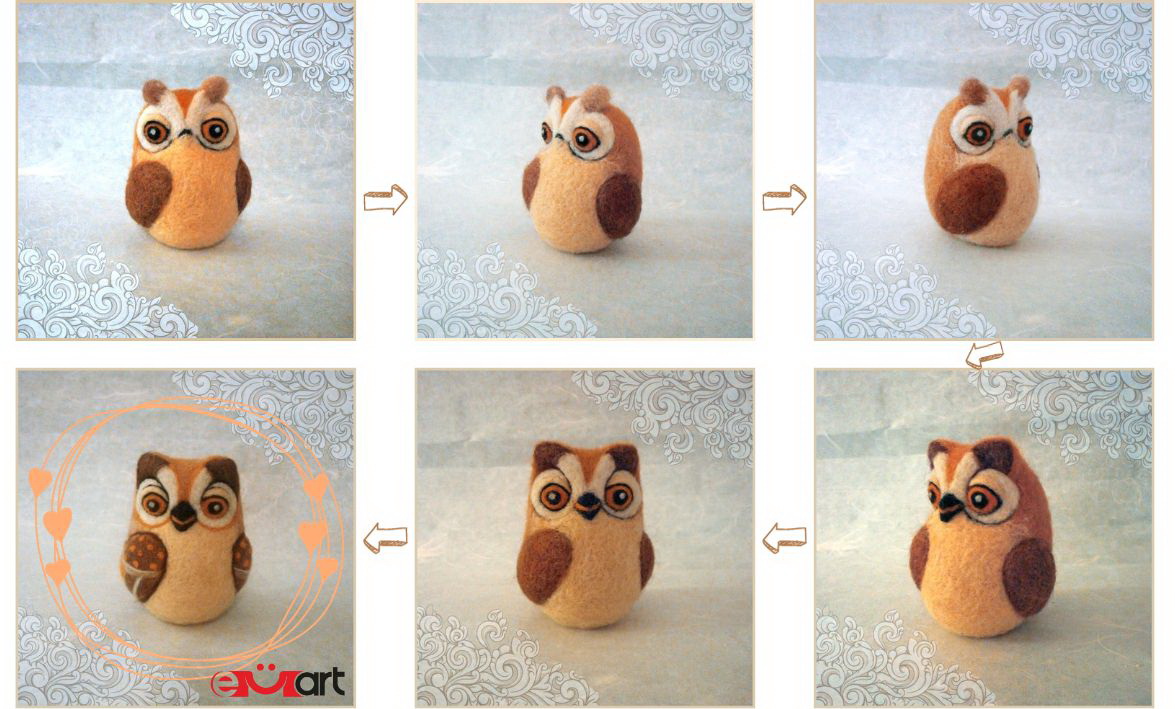
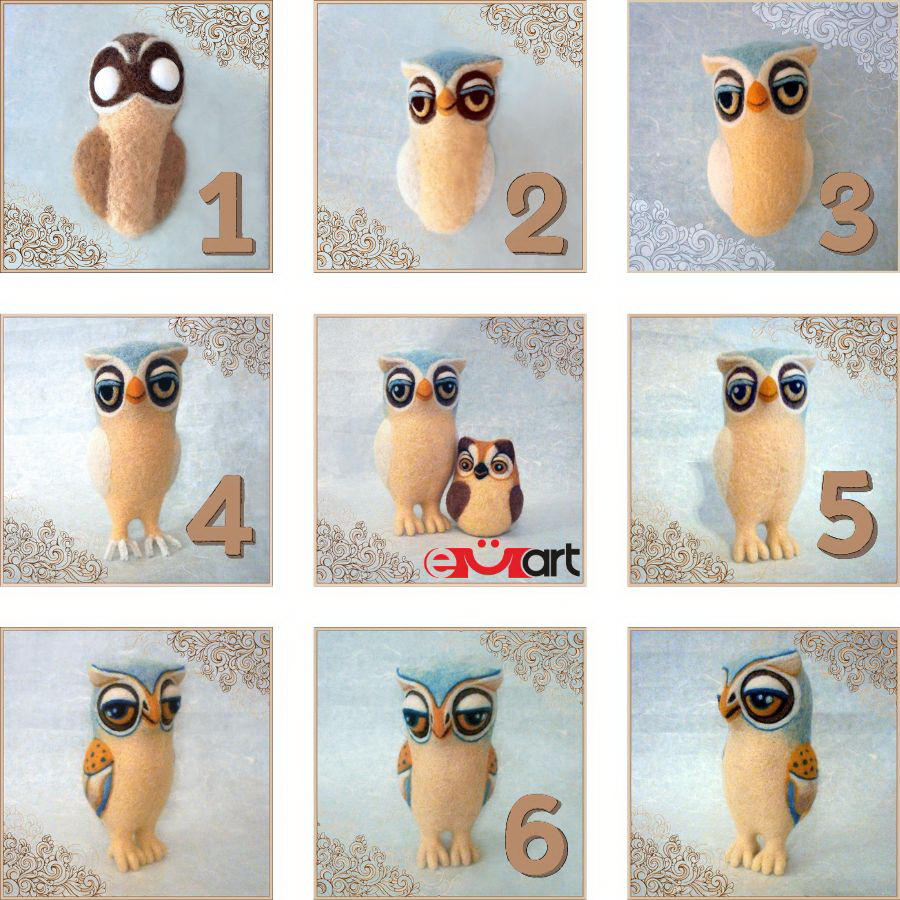
Here we have prepared to show you step by step the creation of two different needle felted owls with different sizes and chosen colors of the wool – let’s call them mother owl and her innocent child. 😊
Use this time wisely and “steal” and recreate every step that suits well for your personal project, but don’t be afraid to add changes. Everyone should feel free to personalize or improve his masterpieces!
We will start by making the small owl, which has a voluminous and oval-shaped body. For this, we will use a Styrofoam egg as the base.
To reshape it a bit, we’ve used a simple modeling knife.
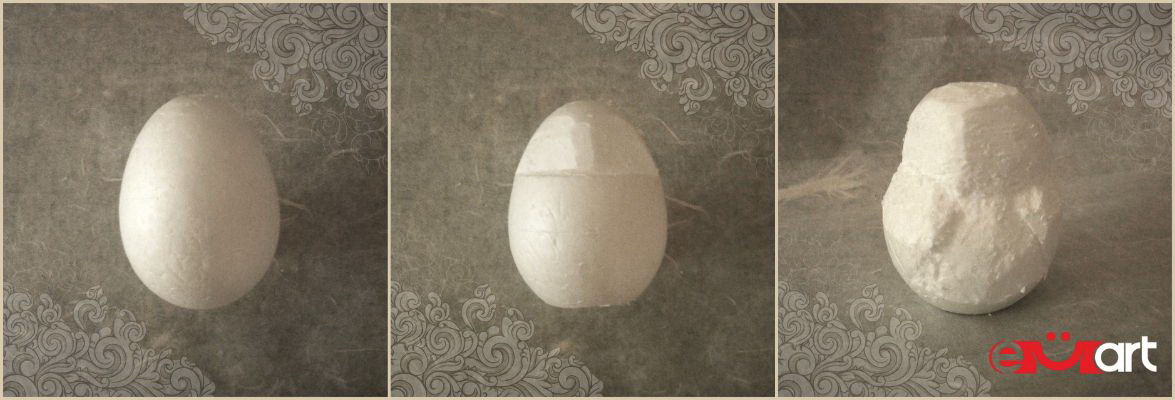
Step 1: Wrapping the Egg with Wool
Tease the wool apart nicely before starting the felting process. Wrap the Styrofoam egg with fluffy, teased wool, ensuring it is evenly covered. Use a large needle with densely arranged barbs to felt the wool loosely, rather than tightly.
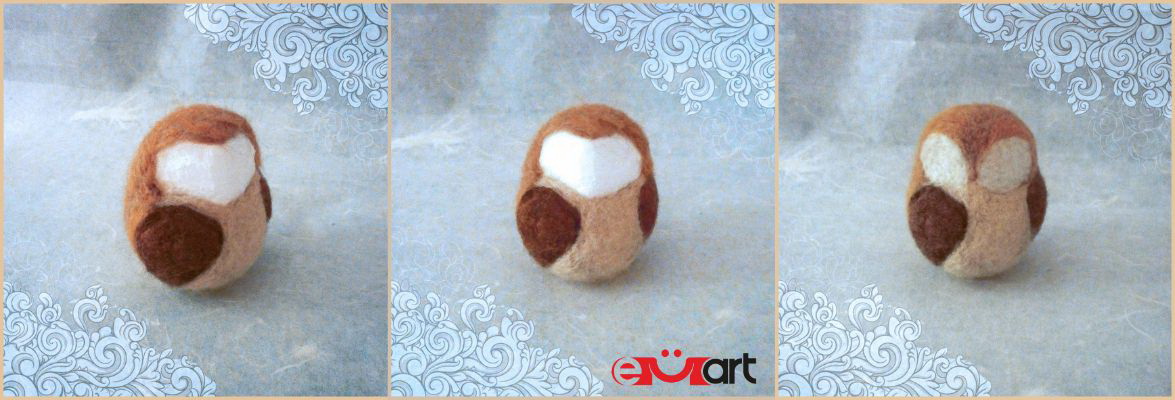
Step 2: Creating the General Shape and Positioning the Eyes
Once the general shape is created, locate the position of the eyes. Switch to using a medium needle. Shape the eyes like balls before adding color and other details.
Step 3: Shaping and Building the Form
Needle felting involves building the form solely through addition. Use the needle to shape and add wool as needed. Trust your instincts and make intuitive judgments while shaping the owl. Work on the overall form before focusing on specific details.
Adjustments can be made if necessary to achieve the desired outcome.
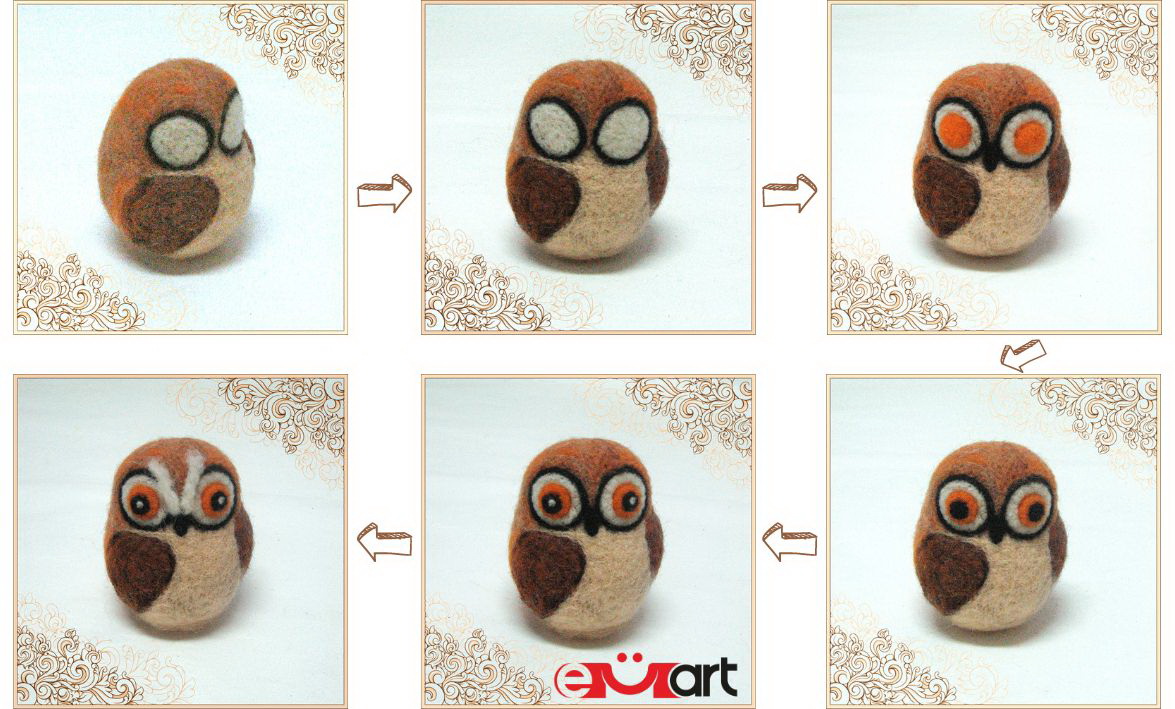
Step 4: Decorating the Owl
Once the form is fully completed, you can decorate it according to your own design. Have fun adding details and embellishments to personalize your owl!
Now let’s move on to creating the "mother owl" using a Styrofoam ball, a Styrofoam heart, and small half-spheres for the eyes. You can easily find them on the EMART online store.
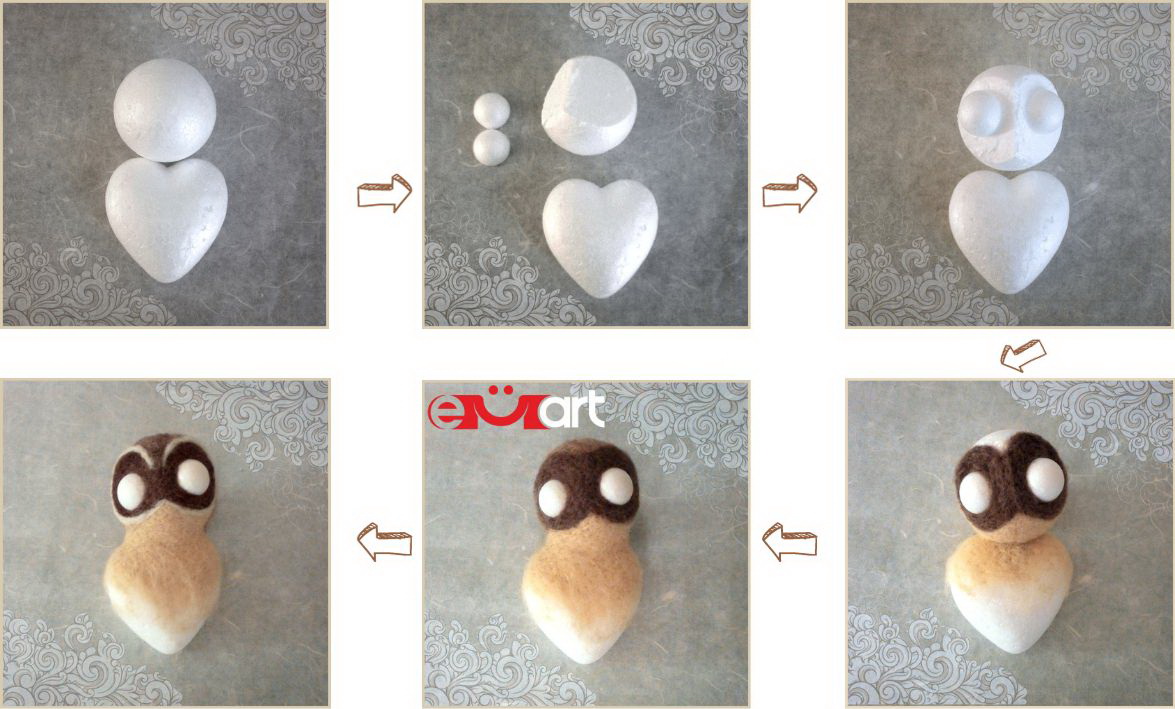
Step 5: Building the Form of the Mother Owl
Repeat the process of shaping and building the form, considering color combinations. Smooth the surface of the form using a finer needle, gently pulling and pushing stray fibers inward at a strong angle. Pay special attention to neatness at color transition points to maintain clear lines.
Step 6: Arranging the Owls in a Wreath
Finally, arrange the owls in a wreath along with flower buds or leaves. Use a wreath made of branches as the base. Add a decorative budding branch and fabric flowers to enhance the arrangement.
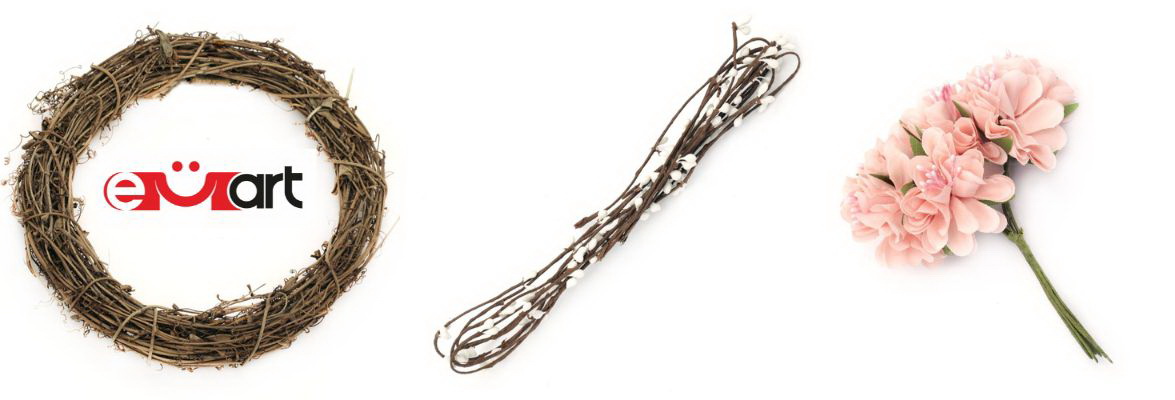
By following these steps, you can easily create charming needle felted owls and showcase them beautifully in a wreath with additional floral elements!
If you’ve already rolled up your sleeves and can’t wait to create your unique owl figures or other inspiring birds through dry felting, don’t miss the opportunity to share your experience and beautiful creations in the comments below the article!
Frequently Asked Questions for Needle Felting and the Needle Felted Owls:
Q: What is a Felting Needle?
A: A felting needle is a specialized needle used in the craft of needle felting. It has barbs along its shaft that catch and tangle fibers together, allowing you to sculpt and shape wool or other fibers.
Q: Is Needle Felting Owls suitable for children and teenagers?
A: Needle felting owls can be enjoyed by older children and teenagers under adult supervision. The sharp needles used in the process require caution, so it’s important to ensure proper handling and safety measures are in place.
Q: How can I needle felt anything without poking my fingers?
A: To avoid poking your fingers while needle felting the Owls, it’s recommended to use a foam pad as a work surface. This provides a cushioning effect and helps protect your fingers from accidental pricks. Additionally, it’s important to maintain focus and control while working with the needles.
Q: How do I create different shapes and details in needle felted owls?
A: You can create different shapes and details in needle felted owls by using various techniques such as adding layers of wool, shaping with your fingers or tools, and using finer gauge needles for intricate work. Experimenting with different needle felting techniques will help you achieve the desired shapes and details.
Q: Can I add colors to my needle felted owls?
A: Yes, you can add colors to your needle felted owls by using different colored wool fibers. You can blend different shades of wool together or add details using colored fibers to bring your owls to life.
Q: Can I wash my needle felted owls?
A: Needle felted owls can be delicate, so it’s best to avoid washing them. However, if necessary, spot cleaning with a damp cloth and mild soap may be possible. It’s important to gently dab and avoid excessive rubbing to preserve the shape and integrity of the felted owl.
Q: What other forms of arts and crafts can incorporate owl patterns or shapes?
A: In short, almost every type of art or craft can incorporate owls, whether through shapes, patterns or figures. For example, you can easily find owl-shaped pendants, wooden owl buttons, Paint-by-number kits with owls , 3D diamond painting kits with owls, owl-looking parts for jewelry making, owl-themed napkins to decoupage with, silicone molds shaped as an owl and many, many more. The versatility of owl motifs allows for endless creative possibilities across various art forms!
| Daya (Daya) | Daya |
 I am a huge enthusiast of creating new handmade beauties, whether it is with beads, paper and pen, canvas and acrylic, or yarn. Every form of art or intricate crafting brings additional inspiration! If you are curious about what else we can make and craft with art and craft materials, stay tuned for updates in the blog and, of course, feel free to share your ideas!
| All articles on Daya |
Rate the article 5.00/5 from 4 grades. |
|
| You have already voted for the article | |
Recommended articles
 HANDMADE MARTENITSA FOR HOME AND OFFICE
 EM ART WATCHES WHERE STYLE MEETS COMFORT
 CLEANSING AND CHARGING AMAZONITE
 LOOM BANDS THE NEW GLOBAL TREND
Labels/Tags
 0 Comments

| 0 |

| 0 |

| 0 |

|

| 0 |

|
 Subscribe ♥
SEARCH

|

|
Categories
 New
New


Recent Posts
IN THE WORLD OF QUILLING ART
THE MAGIC OF CREATIVE KITS
A HANDMADE BRACELET IS THE PERFECT GIFT FOR A FRIEND
WHAT SHOULD WE KNOW ABOUT JASPER PENDANTS?
3 TOP IDEAS FOR TEMPORARY WALL DECOR AT AN AFFORDABLE PRICE
WOODEN ELEMENTS A TIMELESS TREND FOR YOUR HOME
AMAZING WEDDING DAY CARDS
Recent comments
Dawn Sullivan за IN THE WORLD OF QUILLING ART
Laura за THE ULTIMATE GUIDE TO CLEANSING AND CHARGING GARNET
JER за Discover and Master the Art of 3D Pen Drawings - A Step-by-Step Guide for 2D and 3D Objects and Sculptures
november birthstone за Discover the Power of Your Birthstones by Month, Zodiac Sign and Day of the Week
